Decorating, color and design with a divine French twist, plus lots of crafty DIY weekend projects to enhance your home!
Friday, April 8, 2011
Romantic Style - My Lovely Prize Book!
I just had to take a little time here and tell you about a wonderful interior design book that I was lucky enough to win in the prize giveaway run by Mandy at her lovely blog à-la-parisienne and also Debbie from powder-blue who donated the book.
What Luck!
It's called 'Romantic Style' and if like me, you love the 'Shabby Chic' look in all its forms, then put your hand in your purse and get out the plastic! This book is going to give you lots of ideas and inspiration for decorating your home.
Selina Lake and Sara Norman together with their photographer, Debi Treloar, have produced a well laid out book that illustrates the different aspects of romantic style decor, and I'll have to say that Debi Treloar's photos of the homes they have chosen, are truly inspiring.
I particularly like the mix of vintage finds with decoration which doesn't cost an arm and a leg that we can easily do ourselves. All you need are a few ideas of color matching, start hunting through garage or car boot sales for bits 'n bobs that the sellers might not want, but you can find just the right spot for, and it probably only needs a bit of a clean or perhaps a paint job to give it a new lease of life.
Well, this is just my slant on Romantic Style. I know for sure, as soon as you start leafing through you own copy, you will find lots of other ideas and inspirations that you can particularly relate to your own home decoration.
If you would like to buy the book, you can go to the publisher's website:
The price is: £19.99 or $29.95
Title: Romantic Style
Authors: Selina Lake & Sara Norrman
Photographer: Debi Treloar
ISBN No: 978-1-84975-040-0
Thursday, March 24, 2011
DIY Shabby Chic White Frame For Wall Display Part 2
Are You Ready For Part 2 of our tutorial? Part 1 is here if you missed it
First of all, give your frame a good dust down and lightly sand the surface. Now is a good time to get the vacume cleaner out and give the frame and your work surface a big clean-up so that when you start painting, everything is dust free.
Undercoat - Start with an undercoat - I am using a white one for wood. When it is dry, apply the first color coat :
First Color
I prefer an Acrylic (water based) Mat Emulsion that is used for decorating, it is easy to find a huge range of colors in your local DIY Store. The two colors I am using, are left over from decorating my bathroom last month, I had them mixed at the store after choosing from the extensive number of shade cards there. Just be sure that you buy a MAT emulsion - NOT satin or gloss. Using water based paints also has the added advantage of being quick drying and less smelly!
Put a few spoonfuls of the first color on your plate, dip your brush in the water and stir the paint around - perhaps do this twice - in other words, we are diluting the paint a LITTLE, but not too much.
Brush the paint onto your prepared frame with light strokes and cover all the surface, pushing the paint into all the little nooks and crannies if your frame is very ornate. Don't worry if it looks a bit streaky, remember that this is the first coat.
Well, we are waiting for the paint to dry now! What are you going to do for the next couple of hours? Go shopping? Off to a Football Match? Work Out at the Gym (I prefer Yoga myself), or perhaps start preparing lunch or dinner - lots of food ideas in our 'DELICIOUS' section!
Second Color
OK - It's 2 hours later! Let's apply the second color - put some of your paint on the (clean) plate, diluted as before, by dipping your (clean) brush in water a couple of times. Now, with your damp sponge (I buy a washing-up sponge and then cut it into 4 pieces), dip it into the diluted paint and very lightly tap the sponge onto your frame, highlighting the relief and the sides. Feel free here - don't be afraid, let your spontinaeity show through - we are doing the 'arty' bit now!
What next? Your efforts probably look a little 'thin' and transparent, mine needs more depth, so with a small paint brush, start to paint over some of the highlights to give more emphasis to the relief. Respond to your work, does it need a bit more sponging now? Mine does, so that is what I'm going to do, but every piece of work is different - JUST RELAX & ENJOY THE EXPERIENCE. If you make a mistake don't worry about it - you can always paint over and start again - but is it a mistake? Perhaps not, perhaps the 'mistake' is adding a new dimension to your work, so don't be in too much of a hurry to paint things out - think about it for a while!
Now, I I'm going to finish there with this frame, it is so ornate I don't think it needs anything else added paint wise and I love the 'stone' look that has evolved. SO - 'LET THE PAINT DRY'!
Hope you had a nice lunch, did you football team win? Had a good workout? I hope you left that computer alone!
Just to finish off - you need to put some protection on your work of art! There are two ways of doing this, either with a final coat of Transparent Mat Polyurethane Varnish, or a nice Bees Wax Polish gives a lovely soft sheen and feel that is well worth the effort of all the elbow grease that is needed in all the polishing.
On the other frame I am doing at the same time, I'm going to add a little extra before the varnish or polish, but I'll leave that for Part 3, so see you soon!
First of all, give your frame a good dust down and lightly sand the surface. Now is a good time to get the vacume cleaner out and give the frame and your work surface a big clean-up so that when you start painting, everything is dust free.
Undercoat - Start with an undercoat - I am using a white one for wood. When it is dry, apply the first color coat :
First Color
I prefer an Acrylic (water based) Mat Emulsion that is used for decorating, it is easy to find a huge range of colors in your local DIY Store. The two colors I am using, are left over from decorating my bathroom last month, I had them mixed at the store after choosing from the extensive number of shade cards there. Just be sure that you buy a MAT emulsion - NOT satin or gloss. Using water based paints also has the added advantage of being quick drying and less smelly!
Put a few spoonfuls of the first color on your plate, dip your brush in the water and stir the paint around - perhaps do this twice - in other words, we are diluting the paint a LITTLE, but not too much.
Brush the paint onto your prepared frame with light strokes and cover all the surface, pushing the paint into all the little nooks and crannies if your frame is very ornate. Don't worry if it looks a bit streaky, remember that this is the first coat.
Well, we are waiting for the paint to dry now! What are you going to do for the next couple of hours? Go shopping? Off to a Football Match? Work Out at the Gym (I prefer Yoga myself), or perhaps start preparing lunch or dinner - lots of food ideas in our 'DELICIOUS' section!
Second Color
OK - It's 2 hours later! Let's apply the second color - put some of your paint on the (clean) plate, diluted as before, by dipping your (clean) brush in water a couple of times. Now, with your damp sponge (I buy a washing-up sponge and then cut it into 4 pieces), dip it into the diluted paint and very lightly tap the sponge onto your frame, highlighting the relief and the sides. Feel free here - don't be afraid, let your spontinaeity show through - we are doing the 'arty' bit now!
What next? Your efforts probably look a little 'thin' and transparent, mine needs more depth, so with a small paint brush, start to paint over some of the highlights to give more emphasis to the relief. Respond to your work, does it need a bit more sponging now? Mine does, so that is what I'm going to do, but every piece of work is different - JUST RELAX & ENJOY THE EXPERIENCE. If you make a mistake don't worry about it - you can always paint over and start again - but is it a mistake? Perhaps not, perhaps the 'mistake' is adding a new dimension to your work, so don't be in too much of a hurry to paint things out - think about it for a while!
Now, I I'm going to finish there with this frame, it is so ornate I don't think it needs anything else added paint wise and I love the 'stone' look that has evolved. SO - 'LET THE PAINT DRY'!
Hope you had a nice lunch, did you football team win? Had a good workout? I hope you left that computer alone!
Just to finish off - you need to put some protection on your work of art! There are two ways of doing this, either with a final coat of Transparent Mat Polyurethane Varnish, or a nice Bees Wax Polish gives a lovely soft sheen and feel that is well worth the effort of all the elbow grease that is needed in all the polishing.
On the other frame I am doing at the same time, I'm going to add a little extra before the varnish or polish, but I'll leave that for Part 3, so see you soon!
Garage/Car Boot Sales - Start Collecting!
When you are 'Out and About' - perhaps browsing around your local Car Boot or Garage Sale (called 'brocante' by the way in French), as well as looking for old frames for our tutorial, keep a look out for a few other items that we will be using in future DIY projects. For instance:
Old Keys
Interesting Postcards
Old Photos
Old Books with Interesting Text
I'm sure I'll think of lots more as time goes by - keep an eye on the 'Out & About' section for new collectable ideas!
Old Keys
Interesting Postcards
Old Photos
Old Books with Interesting Text
I'm sure I'll think of lots more as time goes by - keep an eye on the 'Out & About' section for new collectable ideas!
Tuesday, March 22, 2011
DIY Shabby Chic White Frame For Wall Display Part 1
I hate waste and I love a 'Shabby Chic' look, so I thought, let's put the two together and make something SPECIAL!
As you might know, Martin and I make picture and photo frames in our little studio here in SW France and over the years we seem to have accumulated a stockpile of redundant moulding, some of which is quite startlingly elaborate. Surely I can do something with this, so I hauled out a few pieces that were lurking in the back of the garage, gave them a good dust down and gathered a few materials together to give a new lease of life to these long forgotten beauties.*
Would you like to follow along and have a go yourself at the same time? Obviously we have an advantage here of lots of old moulding hanging around, but if you take a stroll down to your local car boot/garage sales (called 'brocante' here in France) this weekend, I am sure you will find a selection of old frames that are pleading with you to buy them and give them a makeover.
Are you up for it? OK, this is what you need:
1. Old frame
2. Vacume cleaner with little brush attachment.
3. Fine sandpaper (No.2)
4. Undercoat Paint. You will have to decide which type to use for the surface you are working on. I used one for wood.
5. Acrylic Mat Paint - I used the remains of the two colors I used for the bathroom I've just painted which as you will see are an 'Off White' and 'Stone' (color swatch below).
6. I did use a touch of Acrylic Artists Color (White) at the end for added enhancement, but this is not strickly necessary.
7. Bees Wax or Acrylic Mat Varnish.
8. Brushes + Old Plate + Water Jars + Old Knife + Wooden Blocks to put the frame on whilst working.
9. A packet of dish washing sponges.
*Yes, I know what you are thinking - The old stuff looks beautiful and I agree! We still make frames with this lovely moulding - you can see them here at our website - these are just odd bits that are too damaged for the real thing.
See you later for part 2.
Saturday, March 19, 2011
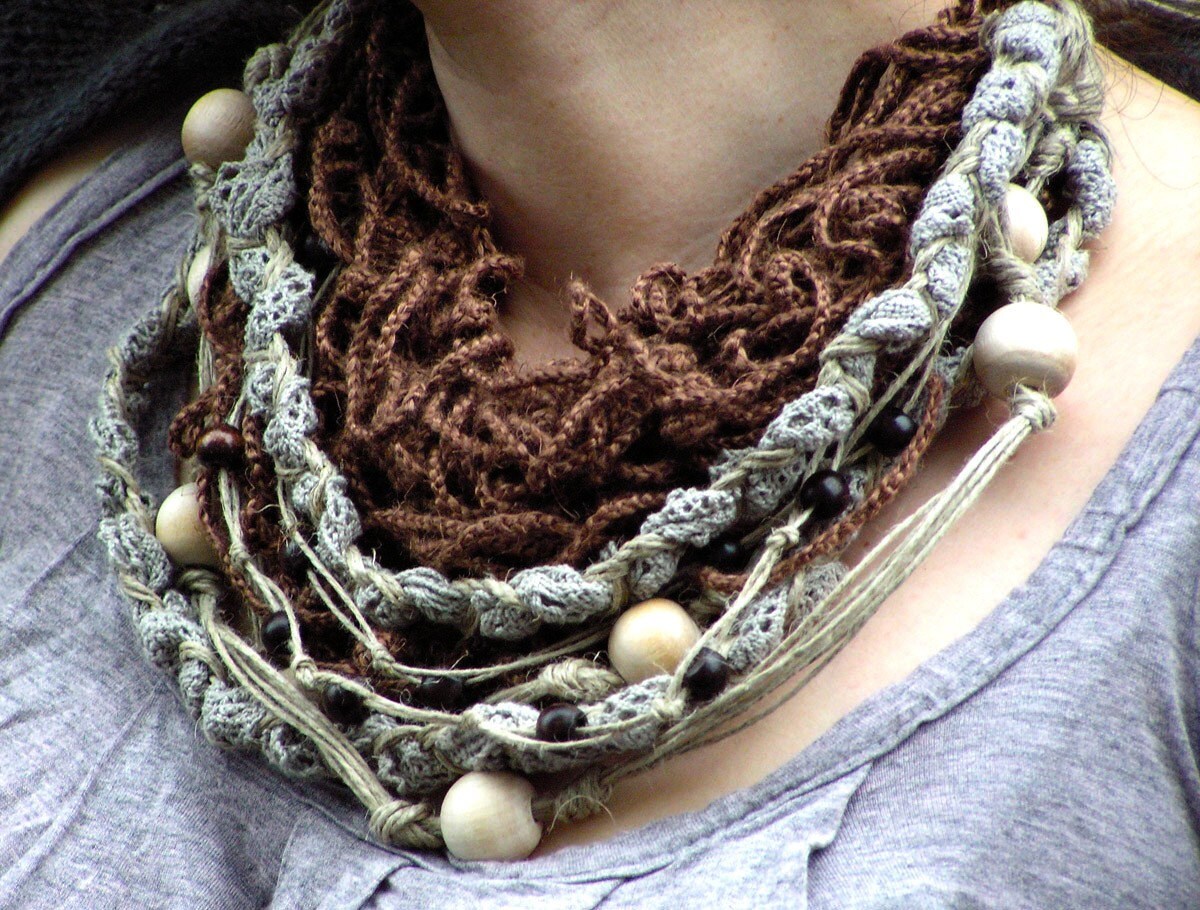
Crocheted Bead Linen Neck Warmer
I just happened to see this most original neckwarmer come necklace whilst browsing on Etsy. I've never seen anything quite like it before, ideal I think for this time of year when there is still a little chill in the air even though spring is just around the corner! Certainly makes a change from the scarves that are the usual alternatives.
If you would like to taker a closer look at this lovely object of desire, go to hypericumfragile Monika's Etsy shop.
Sunday, February 27, 2011
Marry in Red
Why do brides always seem to choose white or cream to get married in. There are so many beutiful colors out there - BE BOLD & CONFIDENT I say! Here are a few ideas on using the color RED.
Tuesday, February 22, 2011
Ikea Stonehenge
Ikea Stonehenge!
Don't think this Flat Pack will fit in the back of the car - do you think I might have to take the trailer?!!!
Subscribe to:
Posts (Atom)